ARC command.
The ARC command is used to create arcs.
Command Access:
Ribbon : Home > Draw> Arc
Menu : Draw > Arc
Command : ARC
Command Prompts:
Specify start point of arc or [Center]:
Function Description:
Users could create arcs by specifying combinations of center point, endpoint, start point, radius, angle, chord length, and direction.
Relative Glossary:
Start point:
Specify the start point of arc.
Note : if pressing ENTER without specifying the start point, the last endpoint of straight line or arc will become start point and prompt to specify endpoint of arc. It will create an arc that tangent to the last straight line or arc or polyline.
Second point: Create an arc by three specified points; those points are all on the same circle. The first point is start point, the third point is endpoint, and the second point is one point on circle.
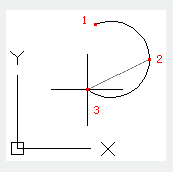
Those three points could specify an arc clockwise or anticlockwise.
Center:
Specify the center of a circle; the created arc is a part of circle.
Endpoint:
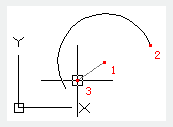
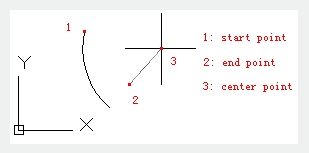
Specify the center 1 and create an arc from the start point 2 to the end point 3 in anticlockwise. The end point is on an assumed ray that started from the center point to the end point, so the endpoint may be not on created arc.
Angle:
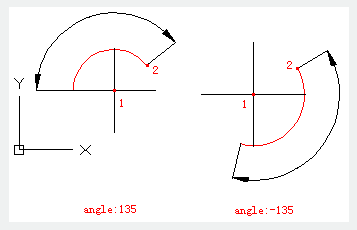
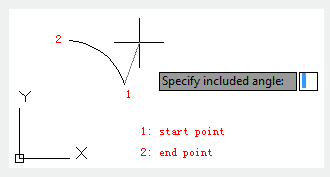
Specify the center 1 and create an arc from the start point 2 with a specified included angle. If the included angle is negative, the arc will be created in clockwise; if it is positive, the arc will be created in anticlockwise.
Chord length:
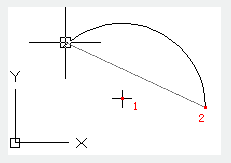
Create an arc by a specified chord length; the chord is a line segment from the start point to endpoint of arc. If specifying the chord length to a positive value, it will create a minor arc from the start point in anticlockwise direction; if specifying a negative value, it will create a major arc in anticlockwise direction
End:
Specify the endpoint of an arc.
Center:
Create an arc from start point to endpoint in anticlockwise direction. The end point is on an assumed ray that started from center point to the second specified point.
Angle:
Create an arc with a specified angle from start point to endpoint. If the inputted angle is negative, the arc will be created in clockwise direction.
Direction:
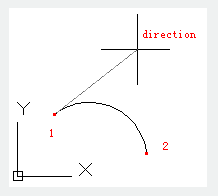
Create an arc from start point to endpoint and specify the tangent line direction of the start point. Users only need to determine tangency direction without regard to anticlockwise or clockwise, major arc or minor arc.
Center:
Specify the center of an arc.
Endpoint:
The point 1 is center of arc. The arc is from the point 2 to point 3. It is created in anticlockwise. The point 3 is located on the assumed line from center point 1 to point 3.
Radius:
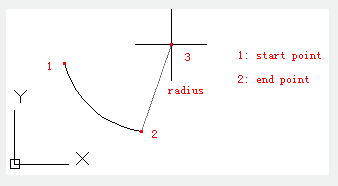
Create a minor arc from the start point to end point. If inputting a negative value for radius, it will create a major
Center:
Specify the center of an arc.
Endpoint:
The point 1 is center of arc. The arc is from the point 2 to point 3. It is created in anticlockwise. The point 3 is located on the assumed line from center point 1 to point 3.
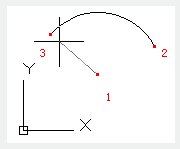
Angle:
The point 1 is center of arc. The included angle is from the point 2. It is created in anticlockwise. If inputting a negative angle, the arc will be created in clockwise direction.
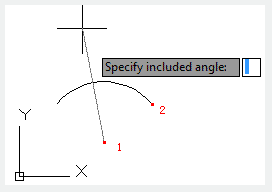
Chord length:
The point 1 is center of arc. The chord length is the distance from the point 2 to the endpoint. Users could create a major arc or minor arc by specied chord length. If inputting a positive chord length value, it will create a minor arc in anticlockwise; if inputting a negative chord length value, it will create a major arc in anticlockwise.
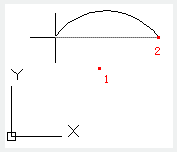
Related tutorial video:
- Status bar related setting 00:23
- Line command 00:33
- Polar 00:39
- Edit objects + grips 00:56
- Grips System variable 00:56
- Use grips to edit objects 00:56
- Properties command 01:16
- Display and change the properties of objects 01:16
- Linetype command 01:26
- -Linetype command 01:26
- Control Line Scale 01:26
- Color command 01:33
- Change the color of an object 01:33
- Set the current color 01:33
- Polyline command 02:00
- Fillet command 02:40
- Draw Rectangles and Polygons 03:01
- Revcloud command 03:10
- Donut command 03:14
- Draw Donuts 03:14
- Edit objects + grips 03:23
- Grips System variable 03:23
- Use grips to edit objects 03:23
- ARC command 03:54
- How to draw an arc with specific arc length 03:54
- Circle command 04:42
- Concentric circle command 04:54
- Properties command 05:54
- Mirror command 05:16
- Status bar related setting 00:15
- Draw Rectangles and Polygons 00:26
- Rectang command 00:26
- Polygon command 00:26
- Arc command 00:30
- Trim command 00:40
- Extend command 01:51
- Offset command 02:23
- Stretch command 03:35
- Edit objects + grips 03:55
- Break object 04:13
- Circle command 05:51
- Draw circles 05:51
- Break command 05:56
- Join command 06:32
- Scale command 06:53
- Lengthen command 07:29
- Copy command 08:20
- Rotate command 08:47
- Move command 09:07
Above video sources from TUTORIAL - GETTING STARTED WITH GSTARCAD, enrol now for free.
- View command 00:25
- Menus and Shortcut Menus 00:37
- Unisolateobjects command 00:37
- Qnew command 00:48
- Status bar related setting 00:52
- Box command 01:03
- Union command 01:50
- Xedges command 02:03
- Filletedge command 02:08
- Vscurrent command 02:45
- Extrude command 03:27
- Rectang command 04:22
- Move command 04:45
- Line command 05:06
- ARC command 05:16
- Trim command 05:23
- Join command 05:46
- Convtosurface command 06:35
- Slice command 06:51
- Solidedit 08:32
Above video sources from TUTORIAL - GETTING STARTED WITH GSTARCAD, enrol now for free.